Showing posts with label framebuilding. Show all posts

Summary of Fluxes and Fillers for Brass and Silver Brazing

I compiled the following for my welding teacher here in Boone, NC, Steve Ward.  Steve's taught me a lot about all kinds of welding & fabrication.  He teaches a little brazing with flux-coated low-fuming bronze rods.  He's the kind of guy who's always looking for the best tools and supplies, so I compiled this summary of the brazing supplies I've used and heard of, so he can order some of the really nice stuff in the future.

These are but the humble opinions of one brazing nerd.  Please comment freely.
--

Brass brazing flux:
- The blue flux I have is Gasflux brand Type B.  Excellent stuff.  I have bought small quantities (1-2 lbs) in the past year+ directly from Gasflux, but was told during my last order that that would no longer be possible and that I should order from an Airgas dealer in the future.  Details here: http://www.gasflux.com/paste.html
- If that's not an option, there is some even more obscure stuff called Brazage LFB Light flux, produced and sold by a bike framebuilding old-timer, Freddy Parr.  Freddy's stuff is well-regarded by some of the big names in the bike building world.  I've not used it, but I expect it is superb, based on his silver flux:  http://www.cycledesignusa.com/lfblight.htm

Brass brazing fillers:
I like 3/32" diameter best but 1/16" is fine for many things, and gives you more rods per lb.
- The stuff I like best if Gasflux C-04 nickel bronze.  This stuff flows much better than anything I've ever used, especially on stainless.  $9/lb for my last order, which was over a year ago.  Again, I've bought 1 or 2 lb quantities from Gasflux directly, but was directed to Airgas last time.  http://www.gasflux.com/brazing.html
- All-State 11 nickel silver.  I've used several pounds of this, unfortunately in 18" lengths.  They were samples that sat in the back room of a welding store in Richmond for years until I called up asking about brazing rod and someone offered me them for free.  They were flux-coated but the flux was stale so I soaked most of it off.  Very strong stuff, 85 kpsi, but a little less fluid than low-fuming bronze, and harder to file/machine post-braze. Makes small fillets.  http://www.esabna.com/euweb/as_handbook/596as5_2.htm Here it is for sale from Airgas: http://airgas.com/browse/productDetail.aspx?Category=10&product=ESA69063020
- Again, Freddy Parr offers a rod that is presumably excellent: http://www.cycledesignusa.com/brazage_lfb.htm
- Bare low-fuming bronze (LFB).  Any welding store should be able to order some.  Harris or whatever brand they have should be fine.  LFB may not be as consistent quality-wise or as quick to wet out as some of the higher-end stuff, but it gets the job done nicely in the right hands.  I've seen some beautiful fillets laid down with plain LFB.

Silver brazing flux:
- Hands-down the best I've ever used is Stainless Light from Freddy Parr.  Protects beautifully and washes off quickly.  This is the grey flux that inspired my friends & I to start mixing fluxes: http://www.cycledesignusa.com/stainlesslight.htm
- Harris Stay-Silv white flux and black flux.  These are the workhorses of silver brazing fluxes.  It's easier to see what's happening with the white flux, but the black flux remains effective at temperatures 200 F hotter, so is more tolerant of overheating. http://www.harrisproductsgroup.com/en/Products/Alloys/Brazing/Fluxes/Stay-Silv-White-Flux.aspx and http://www.harrisproductsgroup.com/en/Products/Alloys/Brazing/Fluxes/Stay-Silv-Black-Flux.aspx
- Gasflux Type U white flux and Type H black flux.  This is good stuff, but I haven't used it in a while.  From what I remember, the Gasflux washes off faster than the equivalent Harris, but it's also harder to buy.  http://www.gasflux.com/paste.html
- Mixing white and black flux is pretty straightforward.  Once you've added water to both your white and black fluxes to make them into pastes, spoon some of each into a baby food jar.  We've had good luck with something like 3 parts white to 1 part black, but it's not super critical.  Adding more black flux will make it more opaque but more resistant to higher temps.

Silver brazing fillers:
- 56% silver is the "runniest" and most expensive of the silver fillers mentioned here.  Requires tight fitups, but goes liquid at low temps.  It'll join steel to stainless if everything is squeaky clean and the heat is just right.  50N is a better choice for stainless if those conditions can't be met consistently.
- 50N has higher nickel content, which enables it to wet out onto stainless really well.  From what I remember it has about the same "runniness" as 45%.
- 45% works best with relatively loose fitups.  Brazing temps are slightly higher than 56%, and it's noticeably less runny.  Never tried it on stainless.
- I've only used Harris brand silver fillers, and always been satisfied.

On Obscurity

I was at a vintage bike show last year, chatting with a talented framebuilder whose star is rising. I had bought a t-shirt from him earlier, so I mentioned before we parted ways that I was glad to have expanded my collection of obscure frame company t-shirts*.
From the look on his face it was clear he took my comment a little differently than I'd intended it. Perhaps it wasn't the best choice of words. But he was off with his family by the time I realized my fumble.

I wish I could have explained myself as well as Obama did in today's inauguration address:
Our journey has never been one of shortcuts or settling for less. It has not been the path for the faint-hearted — for those who prefer leisure over work, or seek only the pleasures of riches and fame. Rather, it has been the risk-takers, the doers, the makers of things — some celebrated but more often men and women obscure in their labor, who have carried us up the long, rugged path towards prosperity and freedom.
He described better than I can most framebuilders I've come to know. They are doers, makers of things, uninterested in riches and fame. They are obscure but they are kick-ass. Their obscurity is not a liability.  I meant it as a compliment.

This is the kind of person that I strive to be: someone who goes out and gets stuff done and doesn't make a whole lot of noise about it.

*which includes, among others:
Signal
Rebolledo
Courage
Bilenky
Pereira

On Alignment and Alignment Tooling

From Richard Sachs via this post (edited for clarity):
The fixture, once set up, is the part that holds all the mitered tubes.
A full front triangle is assembled, fluxed, and pinned.
I tack the bands on the head lugs, and the sometimes the points of the top and down tube lugs. (it depends on the fits).
I remove this ass'y and transfer it to the alignment table and use tube standards to keep the frame's own weight from skewing a reading.
I tack the seat tube/bb are in alignment.
I ensure the the head tube is "straight" using an M+L (Marchetti tool that extends a steering axis reading over a meter's length.

Then - i free braze all of this, because at this junction, the only errors
Are from my inattention rather than the tools. once the front triangle is brazed.
The flux washed, and the head tube reamed, i use the alignment table to see how close i came.
As jon wrote/suggested, the frames i keep are the ones that meet my alignment standards.
The ones that don't, get tossed.
I toss 3-4 a year on average.
e-RICHIE©™®
from Andy Stewart via this post:
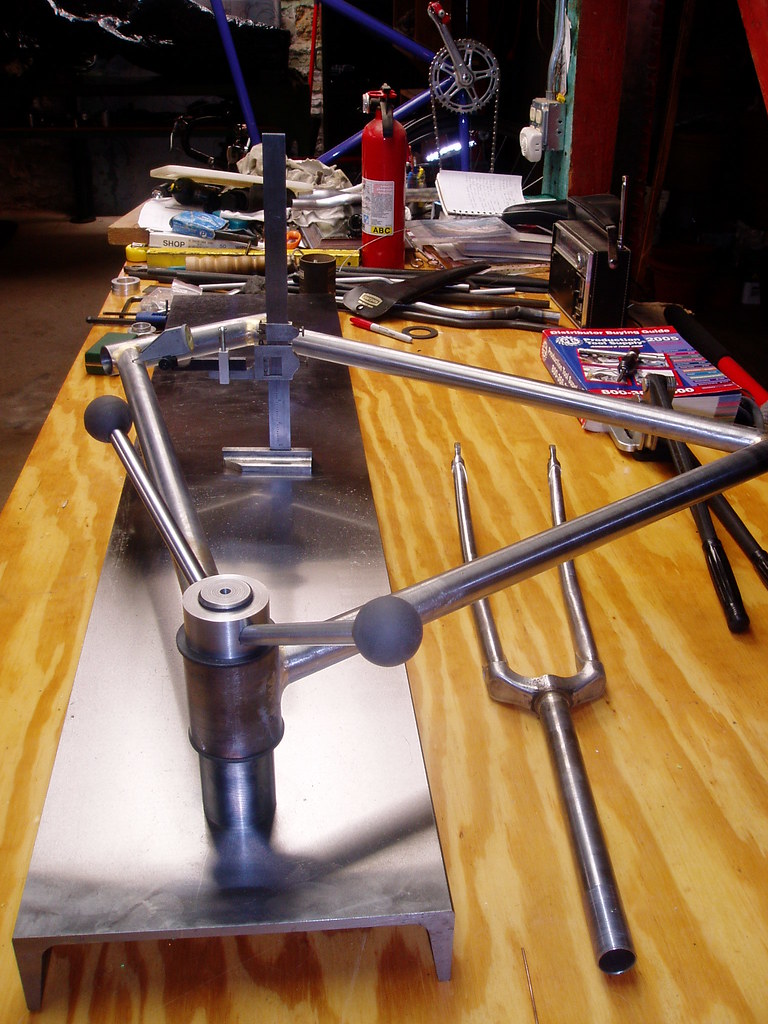
When I first got it I did very basic frame positioning for alignment. Simple "C" clamped the BB to the surface and used a Vernier caliper as a height gauge to measure up to the tubes. As time, imagination and $ allowed I've added a proper BB post, solid measuring tools, dial gauge and recently a fork vice/block for the surface. Each has made working with the surface easier and quicker. My time to build is hard to get these days so being able to take a pinned and tacked main triangle, align it and finish braze it quickly is nice. My BB post is a home designed thing. Steel, hardened and ground. Simple machine bolts and stepped washer are the clamp. Small machine
screw jacks act as the risers for tube support during bending. Various bars act as levers. Home made head tube cones for the alignment bar.
Photos of Andy's setup from my visit to his shop are on my Flickr

From Doug Fattic via this post:
One thing to remember if one is using V blocks on a flat surface to hold tubes is that the height difference between their flat bottom is not the same as the contact points of the V in the block. In other words, you can't raise the bottom of top tube (when it is a 1" tube) V block 1/16" (1/2 the diameter so the tube's centerlines agree) higher than a seat tube V block for a 1 1/8" tube. If memory serves me correctly it is .088" per 1/16" of diameter difference. I've got the formula somewhere if someone wants it.
This should be the height difference (.088") of the shim below a V block holding a 1" tube and a V block holding a 1 1/8" tube. Engineering students will already know this but my undergraduate and graduate studies were in the behavioral sciences (psychology, counseling) so it had to be explained to me.
--
A fancy Italian-made alignment tool plus detail

Alex Wetmore has some sweet alignment tools he made in his basement
, especially these dummy headset bits that hold a 7/8" cheater bar

--

From Cory Swartz
I've made a few different BB posts recently, for different things. 68mm was the intended shell, but 70, 73, anything w/ that same OD/ID would work.
Tandems, EBB, BMX would require some additional pcs that I haven't worked out just yet.
Used 2" round stock, 1018 CRS. Maybe not the fanciest but it is quite economic and very readily available.
I made the diameter to fit inside the bb 1.325" if I remember correctly, nice and snug but not too tight to bugger the threads.
Basically just split the 68mm width in half w/ about an extra .030" or so clearance between the two pcs in case you come across a shell that's a little undersized in width. That's how I got that length, and the bottom surface of the shell to the top of the plate at 100mm seems to be pretty popular.
I think I made the top "cap"(?) @ 1" thick, 3/4" maybe, I forget....
Tapped a 3/8" hole in the center of the bottom and clearance and c/bore for the 3/8 SHCS in the top to hold 'em together.
The bottom of the bottom would be tapped whatever you want. 5/8 or 3/4 or even 1" would be my pick if the bolt holding it to the table is really long.
The one I did for Owen [Lloyd] a while back I think was 3/8, but then he had some other mounting considerations involved.

This is the one I made for Owen [Lloyd], so he could mount to existing inserts in his surface table.

The other(taken apart) is one I made a year or so ago as a "first shot" playing w/ stuff, but you can get the idea...
--

From Alex Meade:


Alex says:
Pretty basic. Hunk of channel iron, which I was fortunate enough to be able to talk a friend into surface grinding for me. Post started out as 2" diam A2 tool steel (got it cheap on eBay), turned threads on both ends, a big nut holds it to the bottom of the channel iron. If I had it to do over again, I'd have turned the post to be a nice tight slip fit for Campy BB facing tool inserts. As it stands now, I usually have to loosen/tighten the top nut after a good tweak to the frame. One day maybe I'll make some inserts for it. Once I finished the post, I heat treated it to Rc 62 so the shoulder doesn't wear with repeated contact with BB shells. So far so good on that score. Top nut is aluminum.
--

Thanks to all who contributed.

Jamie Swan's piece in the Spring 2006 issue (Vol. 4, No. 3) of Vintage Bicycle Quarterly is required reading on the subject of frame alignment.

On tube bending

A local company is trying to bend some 3/4" 4130 tubing to use as stays on BMX frames. I hope to help them make this happen.

I did a little research on this and found this page about bending tubing for recumbents:
http://www.ihpva.org/people/tstrike/building/tubebend.htm

Apparently, bends become difficult or impossible when
( tube diameter / wall thickness )
exceeds 20 : 1.

The .75" x .035" wall tube they've been experimenting with has a ratio of 21.4 : 1, which has led to serious crinkling.

So I will recommend either decreasing tube diameter, like to 5/8":
5/8" (.625") x .035" wall = 17.9 : 1

or, better yet, increasing wall thickness, like to .049":
.75" x .049" wall = 15.3 : 1

Of course, changing this tube spec will affect the frame design. Larger-diameter, thinner-walled tubing is generally stiffer (up to a point) than smaller-diameter, thicker-walled tubing.

Furthermore, bends become difficult or impossible when
( bending diameter / tubing diameter )
is below 8 : 1.

Hence .75" tubing ought to be bent on at least a 3" radius mandrel, which is pretty reasonable. A fork blade bent around a 6" radius is considered "tight".

And of course, the bending rig should accommodate the tubing as described in the link above: good rigidity, mandrels shaped to fit the tube closely, etc.

3D Brake Pivot Jig Mk 2

*** Anyone wondering what the hell this is all about should go back one post***

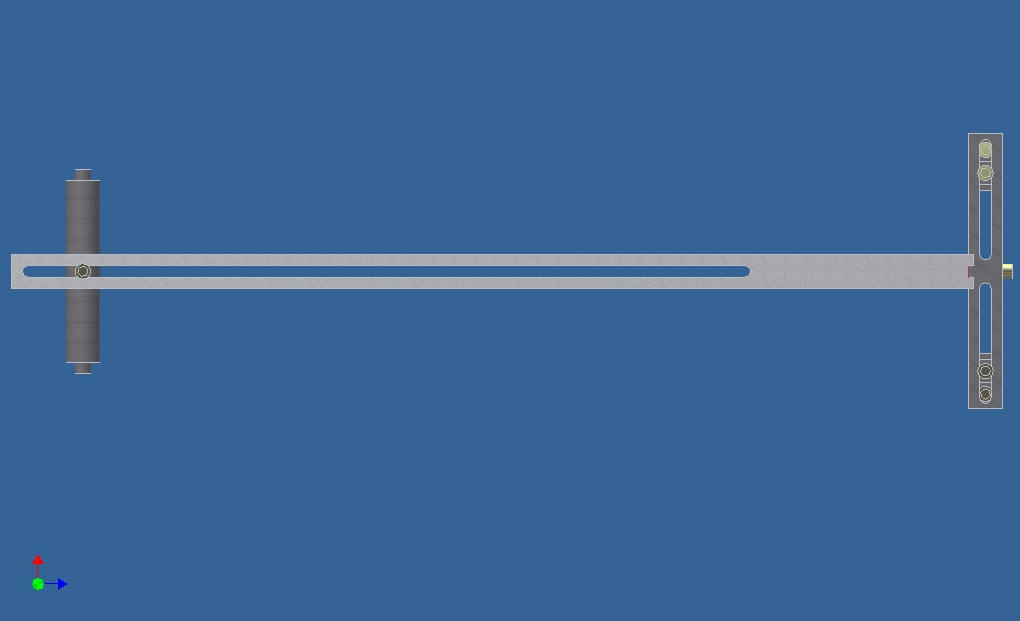
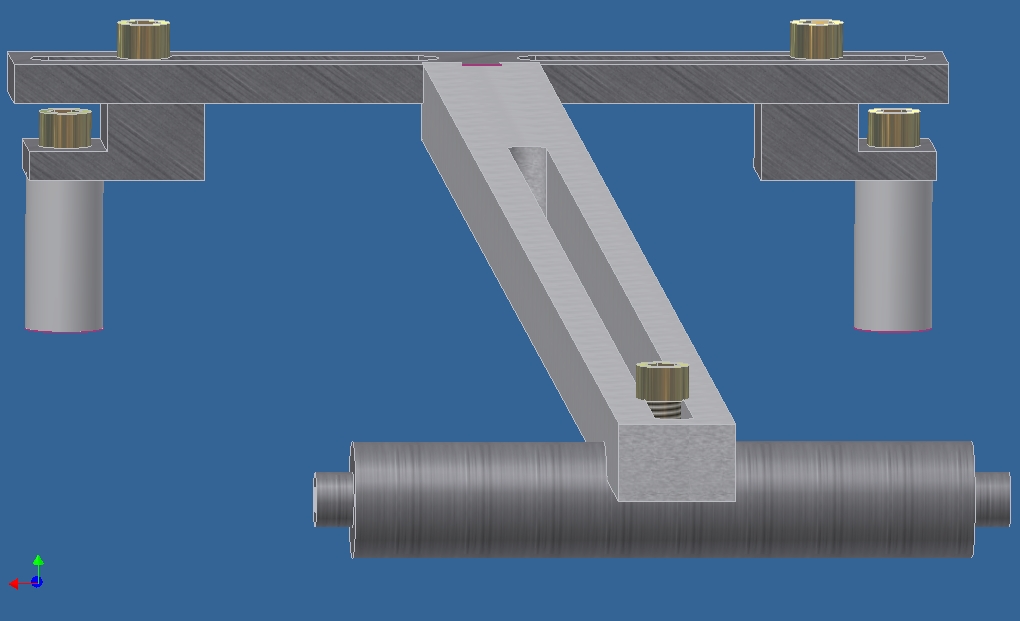
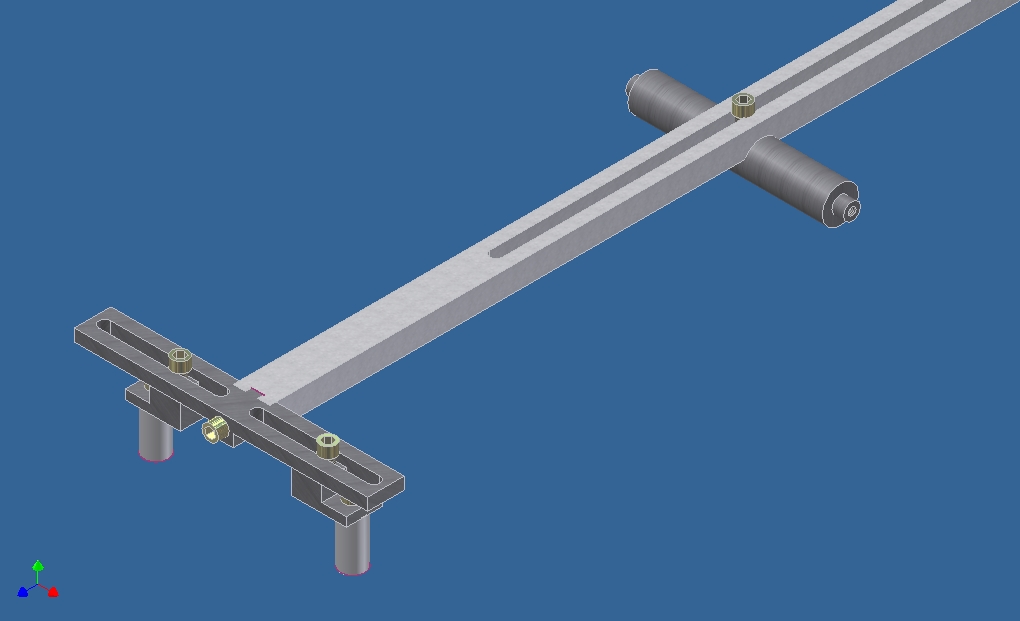
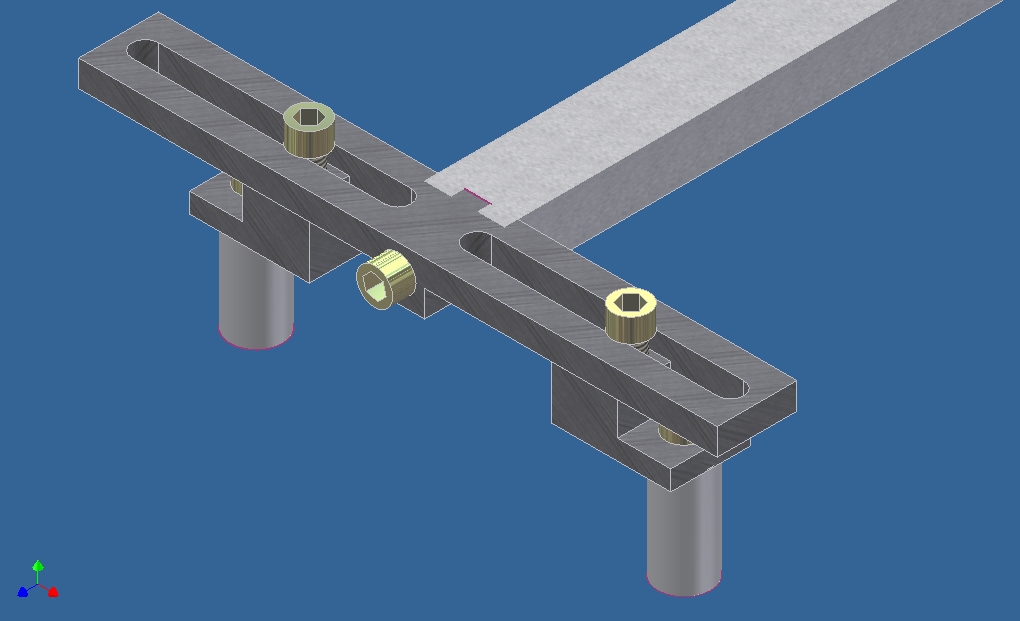
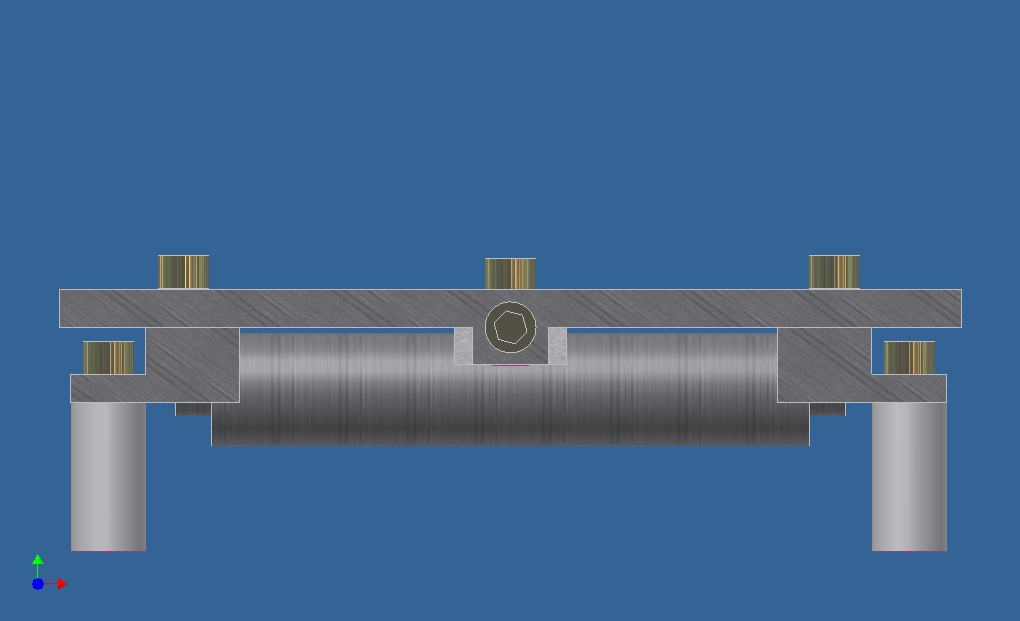
Another night, another brake pivot jig. I'm getting better with Inventor; I made all this from scratch in less than 2.5 hours, and even worked on some actual schoolwork during that time.

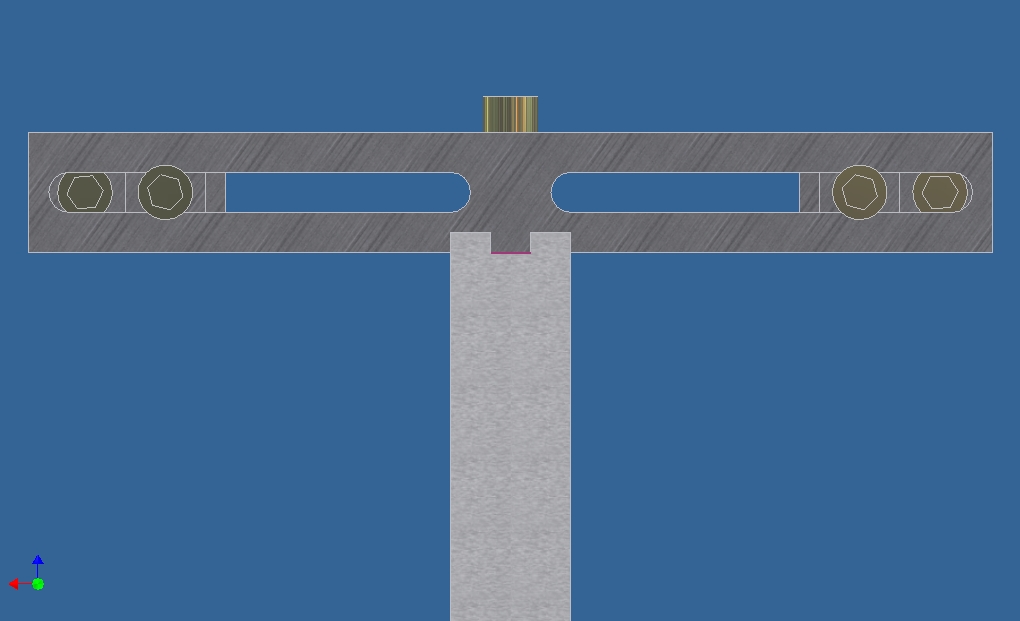
• Distance between pivots is adjustable from 2.25" to 3.5" IIRC...2.5" is stock width for Dia-Compe centerpulls.
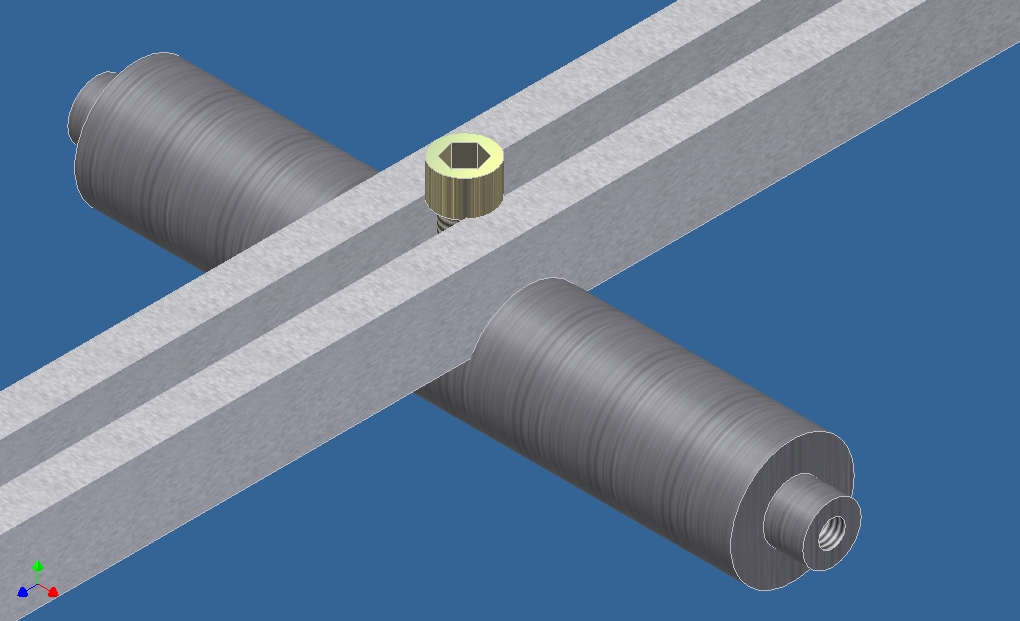
• All indexing slots are 1/4". All hardware is M6, colored gold for jig bling. The brake pivots are included now, colored gray.
• The Backbone Bar is now 1/2" x 3/4" steel. It's 15" long in this rendering, but that's subject to change.
• This design is more complicated and requires more milling, but it was designed to solve a few problems inherent in the last one. Those problems are described here and here.
• I am thinking of using steel for everything, but alu could be used judiciously.
• As drawn, this can be made from the following:
- about 18" of 1/2" x 3/4", in two pieces
- enough 3/4" round for the dummy axle(s)
- a few inches of 3/4" square
(plus a few inches of 1/2" round for the brake pivots)
• I think it's possible to make revisions such that 3/4" round and 1/2" x 3/4" are the only required sizes for the jig itself.

Assembly top view. Dropouts go on the left side.


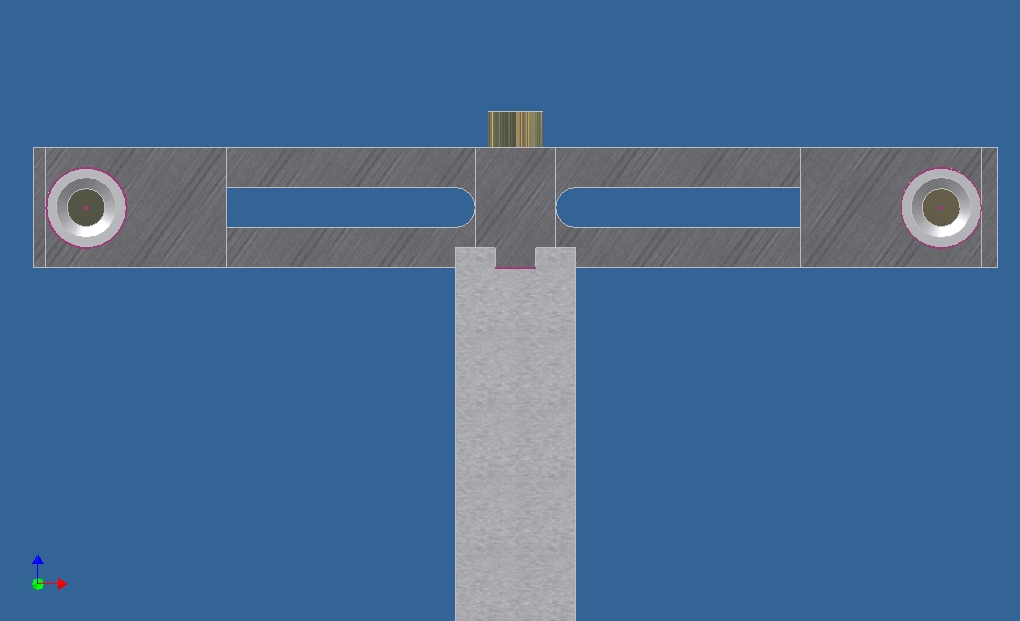
"Crotch shot" looking up from the bottom of the fork.


Isometric view from top right of fork.


Isometric detail view. The pivots aren't symmetric, and it's bothering me a little, but I had to upload in a hurry.

Assembly side view.


Isometric dummy axle view. It has two 1/4" wide slots milled into it, then drilled/tapped M6. This would (I'm pretty sure) be compatible with Bringheli jigs.


Top view detail.


Bottom view detail. You can see that the brake pivots are hollow, and showing the gold-colored M6 bolts that holds each of them to the mating piece.


View looking down steerer tube.

braze-on distances index

i've added this to the framebuilding wiki at http://handmadebicycle.pbwiki.com/Braze-on%20Location%20Index?doneSave=1

cantilever/v-brake bosses

Archive-URL: http://search.bikelist.org/getmsg.asp?Filename=framebuilders.10412.0321.eml
From: "goodrichbikes" 
Subject: Re: [Frame] Canti Boss Location - Std Dimensions Available?
Date: Mon, 20 Dec 2004 13:29:51 -0600

700C(622) = 283mm
26"(559) = 253.5mm
650B(584) = 265mm
A post center to post center measurement of 80mm works best for most canti & v brakes.

Curt Goodrich
Minneapolis, MN

***

Archive-URL: http://search.bikelist.org/getmsg.asp?Filename=framebuilders.10001.0415.eml
Date: Wed, 26 Jan 2000 01:00:11 -0500 (EST)
From: Jeff DelPapa 
Subject: [Frame] measurements question
The last time I asked about canti spacing, the number I got was 80mm center to center,
apparently from the literature of the big S.  I expect it should depend on the rim width,
but they didn't mention a correction.  As to distance from axle, I was told 25mm less
than the bead seat diameter, which worked fine for the canti's I used. (happened to be
scott self energizing -- pre linear pull style.)

***

Archive-URL: http://search.bikelist.org/getmsg.asp?Filename=framebuilders.10510.0373.eml
Subject: Re: [Frame] Brake Boss Location
From: "Jon_norstog AKA \"Thursday\"" 
Date: Fri, 14 Oct 2005 20:03:56 -0600

I'm working from the 1999 Shimano book.  The spacing between canti posts
depends a little on rim width.  basically it's 77-85 mm, but on a road
bike you could probably go down to 75 and be fine..

I use 80 for mountain bikes and 85 for BMXers and bikes that are gonna
run V-brakes and wide rims.

Different V-brakes will have different tire clearances.  This may not be
an issue with cantis.

Good luck

jn
"Thursday"


DT shifter bosses

?????

ISO disc/disk brake mounts

Archive-URL: http://search.bikelist.org/getmsg.asp?Filename=framebuilders.10201.0164.eml
From: ThomasT41(AT)aol.com
Subject: [Frame] ISO mounts and 7005 tubing source
Date: Sun, 13 Jan 2002 12:39:27 EST

For those of you interested here are the iso dimensions for disc brake--can
be found on the net but if your lazy like me.............

mounts- 6mm to 9mm thick, dimensions are plus/minus .1mm

rear ISO brake mounts for disc brake are 51mm(between centers) x79.1mmx39.9mm(axle
center to hole centers), inside flush with inside of drop out

front ISO brake mounts for disc brake are 51mm(between centers) x87.3mmx49.7mm(axle
center to hole centers), inside mount surface set 4mm outboard of the inside drop out face


TT brake cable stops/bosses

Archive-URL: http://search.bikelist.org/getmsg.asp?Filename=framebuilders.10510.0512.eml
From: "Andrew R Stewart" 
Subject: Re: [Frame] TT brake cable BO location - since we're talkin' BO's And
Date: Mon, 24 Oct 2005 20:53:48 -0400

Roman- As I like to be able to run a TT pump I make sure that the stop JUST
clears the pump. Trying for as little of the stop hanging out past the side
of the TT. I like the cast bullet shaped type. The distance from the HT
center is about 10cm. My frames are small and I hate cable loops that are
really tight so I give both the brake and gear cables a bit of room for the
casing to loop away from the bars. ( I run Ergo). Another difference I have
is that I run my brakes righty/front lefty/rear so the TT forward TT stop is
on the TT's right side... the rear stop is on the left side... yes the cable
just grazes the underside of the TT. (Oh my kingdom for five Campy rear
brakes made in a mirror image, the cable on the other side). Again on the
rear stop I place it 10 cm from the ST center. Look at a lot of production
alu or carbon frames and on the smaller sizes the rear stop is so close to
the ST that the cable gets a tight loop, enough to cause friction issues.

water/H2O bottle bosses

Archive-URL: http://search.bikelist.org/getmsg.asp?Filename=framebuilders.10510.0512.eml
From: "Andrew R Stewart" 
Subject: Re: [Frame] TT brake cable BO location - since we're talkin' BO's And
Date: Mon, 24 Oct 2005 20:53:48 -0400

As to water bottle bosses. The bottles overlap. The ST one is as low as
possible, straddling the ft der clamp. The DT set so it clears the ST bottle
by a small bit. About 10cm for the ST and 18.5 for the DT, lower boss to the
BB shell outside surface (add 2cm for BB center).Again small frames and also
46-50 tooth large rings. An interesting story here. Our Co-Motion tandem
also has a set of stoker ST water bottle bosses straddling the der clamp.
they didn't know of our 48 tooth large ring and the der clamp lined up
exactly on the lower boss! So I used a clamp diameter 1/8" larger and a shim
(cut down to clear the boss) and the der mounted right over the boss. Can't
attach a bottle on that tube without some kind of clamping but so far we've
not needed it. Andy S.

***

Archive-URL: http://search.bikelist.org/getmsg.asp?Filename=framebuilders.10510.0456.eml
From: "OMAR KHIEL" 
Subject: Re: [Frame] H20 boss placement question
Date: Wed, 19 Oct 2005 10:57:01 -0700

I have a drilling jig that I use for this.  It places the bottom hole
for the cage at 16cm above the crotch of the ST/DT.  I use it for both
DT and ST boss locations.  Unlike some, I drill and braze WB's on after
the frame is built.
Omar Khiel

***

Archive-URL: http://search.bikelist.org/getmsg.asp?Filename=framebuilders.10510.0442.eml
From: "e-RICHIE" 
Date: Wed, 19 Oct 2005 14:44:17 GMT
Subject: Re: [Frame] H20 boss placement question

i like my two opposing sets of bosses to
be "symmetric". when the seat tube cage is
lower than the down tube cage, it bothers
my eyes. my lower cage boss is usually 19cm
from the bb centerline.
e-RICHIE©™®

***

Archive-URL: http://search.bikelist.org/getmsg.asp?Filename=framebuilders.10510.0444.eml
Date: Wed, 19 Oct 2005 11:39:32 -0400
Subject: Re: [Frame] H20 boss placement question
From: Doug Fattic 

My sense of proportion is the same as Richie's.  I like the seat tube bottle
to be the same distance from the bottom bracket shell as the down tube
bottle.  Sometimes this has to be altered with small frames.  How low they
can be depends on several factors (bb angle, cage, etc) so when I am
particularly fussy, I will put the actual cage with bottle in place and see
where they comfortably just miss each other and mark the spots.  Of course
they shouldn't be so close that a change in cage will make the bottles bump
each other.  I measure from the top of the bottom bracket shell and this
distance is usually between 6 3/4" and 7/8ths.

Doug Fattic
Niles, Michigan

***

Archive-URL: http://search.bikelist.org/getmsg.asp?Filename=framebuilders.10510.0470.eml
Subject: Re: [Frame] H20 boss placement question
From: "Jon_norstog AKA \"Thursday\"" 
Date: Wed, 19 Oct 2005 23:02:47 -0600

I've got a Waterford Paramount in for some frame repairs that has the
lower boss 7.5 inches above the crotch.  On mountain bikes with short
seat tubes, I move the bosses down, 5.25" or so above the crotch, which
gives you a little more than just enough clearance for the derailleur
clamp.

jn
"Thursday"

***

Archive-URL: http://search.bikelist.org/getmsg.asp?Filename=framebuilders.10510.0454.eml
From: Margo Conover 
Date: Wed, 19 Oct 2005 11:41:03 -0600
Subject: [Frame] H2O boss placement

I think this "all depends."  On tiny frames I have to go really
low--like 11cm--in order for the rider to get a big bottle (sometimes
even a small one) in there, particularly if they use a top tube mounted
frame pump.  Also, if the frame uses a clamp-on front derailleur, then
you need to be very aware of where that clamp will sit on the seat tube
when placing the lower boss.

Margo Conover
Luna Cycles, LLC
(505)231-0212
www.lunacycles.com

***

Archive-URL: http://search.bikelist.org/getmsg.asp?Filename=framebuilders.10510.0441.eml
Date: Wed, 19 Oct 2005 16:48:59 +0200
From: M-gineering 
Subject: Re: [Frame] H20 boss placement question

Tom Palermo wrote:
> Seems like most production bikes are hovering around 15cm.

depends on the size of the frame the angles and the cages. I like to
space them fairly symmetrical and often use 200mm (downtube) & 180 mm
seattube. (c-c). But with small frames and big bottles this won't work

Marten

over-/under-BB shifter cable guides

Archive-URL: http://search.bikelist.org/getmsg.asp?Filename=framebuilders.10212.0260.eml
From: "Bill Boston" 
Subject: Re: [Frame] over BB cable guides
Date: Fri, 27 Dec 2002 15:55:02 -0500

I always liked to run the cables over the bottom bracket, but never liked
the Campy guides. I preferred to place 2 cable stops on the downtube, one on
the chain stay and one on the back of the seat tube. this provided good
shifting and it was far easier to paint the frame and was also easier to
clean the frame because toy could move the cable housings. If you go this
route, NEVER use plastic covered or lined cable housing as it will trap
water and dirt and eventually seize up. Bare Stainless cable housing is the
only way to go. Another advantage was that you could bypass the cable stop
on the back of the seat tube and run directly to the cable stop on the front
changer if necessary. This was particularly useful with some of the older
changers that needed a cable housing to function. Fortunately those are no
longer being made.

I probably have a stack of the Campy braze on guides kicking around here
someplace if anyone needs them.

Bill
www.billbostoncycles.com

----- Original Message -----
From: "tim paterek" 
To: "cliff mcleroy" 
Cc: 
Sent: Friday, December 27, 2002 3:13 PM
Subject: Re: [Frame] over BB cable guides


> My feeling on under or over is 50-50. They both have their advantages and both have
> their disadvantages. By all means, the simplest to install is the underneath plastic
> fitting that Shimano makes -- it only requires one tapped 5 X .8 hole in the bottom
> of the BB. The easiest to build with is the integrated underneath guides like the
> ones Henry James provides. One hint for topside guides: I have always tacked the
> tail end of the left guide to the BB shell/seat tube with silver after bending it
> in towards the seat tube. This prevents the guide from bending upward due to hard
> shifting.
>
> Tim Paterek

front pannier/low-rider boss

Archive-URL: http://search.bikelist.org/getmsg.asp?Filename=framebuilders.10605.0369.eml
Subject: RE: [Frame] low-rider and rear rack mount locations
Date: Thu, 18 May 2006 13:17:22 -0500
From: "Dave Gray" 

We use 165mm...center of eyelet to center of lowrider rack boss.

Dave Gray
Surly

***

Archive-URL: http://search.bikelist.org/getmsg.asp?Filename=framebuilders.10605.0370.eml
From: "Omar Khiel" 
Subject: Re: [Frame] low-rider and rear rack mount locations
Date: Thu, 18 May 2006 11:24:27 -0700

I use 165 also.  It works for the rigid mounted Blackburn racks.  I measure
c to c eyelet to boss.
Omar Khiel

filler and flux specs

as listed here:
SIF SILVER SOLDER No.43 (Cd free)

BS: 1845 AG14


CADMIUM FREE 55% Silver Solder, which is free flowing and ideal for close fitting capillary joints and for colour match on stainless.
1.5 mm diameter; melting range 630-660°C (1166-1220°F); typical composition 55% Ag, 21% Cu, 22% Zn, 2% Sn

their Cadmium-bearing No. 42 solder (42% Ag, 25% Cd) melts at a temperature about 30° F cooler and has slightly higher tensile strength.

as listed here:
Gasflux Type U white paste flux is effective from 565-870° C (1050-1600° F).

as listed here:
Wolverine Silvaloy A45 (45% Ag, 30% Cu, 25% Zn) melts between 1225° F and 1370° F.

i'm planning a trip down to the Airgas store near me for from Harris black flux (sorta cheating, this is getting frustrating), maybe some Harris 56% filler, and thin leather gloves (filler is tought to pick up with welding gloves, and i'm not yet very experienced with the torch).

as listed here, Harris Safety-Silv 56 has a different makeup than the similar Sif product: 1 percentage point more Ag, 1 pp more Cu, 5 pp less Zn, 3 pp more Sn. i could see that making a bit of difference, especially the extra tin. and i only have a couple troy oz. of Sif left because i've been globbing it on so much, so i need more anyways.
oh, the Harris spec sheet pdf lists a melting range of 1145-1205°F for Safety-Silv 56, about 20° F lower than Sif 43. will that be noticeable? i'll report soon.

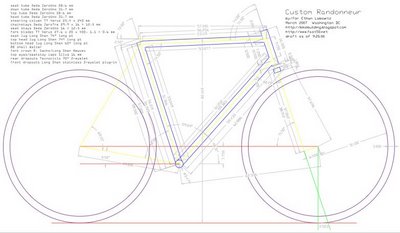
design as jigged


this is a .pdf of the AutoCAD drawing i finished last night. it's still kinda sloppy, and this is with all the dimensions and labels turned on so it's detailed but crowded. Little Fish's drawings provided lots of inspiration.

i tried to braze yesterday without much guidance, and thus without much success. i was using a PurOx #4 tip, which looking back was probably too big. cleaning everything went pretty well, although i learned that i need thick rubber gloves to handle toilet bowl cleaner (Lysol disinfectant, 9.5% HCl). the medical gloves i had on fell apart after cleaning a couple parts. also i was doing a mock head tube-top tube join, which seemed to heat up way too fast to get any good results.

respirators

i've spent a few hours researching respirators lately. yeah, i'm a dork.
at first glance at 3M's respirator and accessory options, i had no idea what i needed, but after looking over their literature i was able to figure it out and get (i think) exactly what i need.
most helpful were the following .pdfs from 3M:
2006 Respirator Product Selection Guide
Half and Full Facepiece Respirators Brochure
Respirator Cartridge and Filter Selection

i ended up buying everything through Cooper Safety, simply because they had the best prices and had everything in stock.
i wanted a system that would filter out all the contaminants i plan to encounter: hydrochloric acid (HCl, in Sno-Bol, for brazing cean-up); acetone (for removing oils prior to HCl), brazing fumes, and particulates generated by grinding. i found out an Acid Gas cartridge is needed for HCl gases, an Organic Vapor for acetone, and a particulate filter is for the other two. there's about six different kinds of particulate filters; the choice is made based on whether or not the particulates are attached to oil molecules (N if not, R if sometimes, and P if yes) and what degree of "filter efficiency" is needed (95=95%, up to 100=99.97% or so). i don't really know for sure what i need in these departments. my metal teacher said N95 is fine for grinding, so i got one of those and a P100 for anything really serious.
to protect against all of these you need the following:
a mask, which straps to your face, covering nose and mouth. i got a 6000, seems adequate.
a pair of cartridges, one of which couples to each side of the mask. there's an array of them available to protect against almost anything. i got an OV/AG: Organic Vapors and Acid Gas.
to add particulate protection, there's a couple options: you can add a pre-filter and retaining ring to the outside of the cartridge, or add a filter adaptor to allow fitting circular filters to the rectangular cartridge (which i opted for, mostly because that's what they had).
i'm still not sure if the filter can be used by itself, which i'd think would be good if the cartridge causes some breathing resistance.