Jimmy Chou is a Chinese chef who worked for my grandparents on and off starting in the seventies. He threatened to quit periodically, and then finally retired for good (probably) last year.
One day while he was cooking I asked Jimmy to teach me to cook. He gave me this recipe, which I've since done my best to get tired of, with no success.
Buy 1 pound chicken, pork, or beef. Chicken breasts are easier than thighs. Pork chops are great. Throw the meat in the freezer for 10-20 minutes to make it easier to slice.
Meanwhile, thinly slice the holy trinity of Jimmy Choo cooking: garlic, ginger, and green onion (spring onion). Per pound of meat, I use 2-4 cloves garlic, a good cubic inch of ginger, and a bunch of spring onion. Use just the white parts of the spring onions, saving the green tops for garnish. For the garlic and ginger, a fine matchstick julienne is ideal.
Slice the meat as thinly as possible with a sharp knife. This takes some practice. One sixteenth to one eighth inch is good. This helps the meat cook properly in the wok. Consistency is more important than thinness. Slice against the grain of the meat.
Marinade the meat in 1/4 cup soy sauce, 1-2 T sugar, plenty of black pepper, and 1 T peanut oil. I substitute maple syrup for sugar sometimes, especially with pork; brown sugar works too. The sugar isn't entirely essential but it adds a glaze. You can use any old soy sauce, but Jimmy insists upon the Wan Ja Sha brand, which is available in most Asian supermarkets. Marinade at least 20 minutes, preferably a couple hours minimum, longer for beef.
Prepare your wok for frying by heating it on medium-high with a few T of peanut oil and a little garlic, ginger, and spring onion. Cook a minute or so--"just until they start to smell", as Jimmy says. Fry the meat in batches: Pick up a quarter or a fifth of a pound of meat, allow some marinade to drip off, and drop into the wok. Let brown a minute or two before stir-frying each batch. If you sliced thinly, a batch should take no more than a couple minutes to cook. Add more oil between batches if needed. Don't cook with very much marinate or the meat won't brown properly. Don't over-cook--remember that meat continues to cook slightly while sitting.
Stir-fried, steamed, or par-boiled vegetables are often served with this. Bok choi works well. Immediately before serving, the meat and the vegetable are combined in the wok to re-heat. The meat-veggie mixture is often served over rice.
This recipe is a religion and a way of life. One week, I made variations of this for dinner every night by varying the protein and the vegetable. Scale up to feed an army. Go gourmet or go freegan. Make it vegetarian by substituting tempeh. Either way, slice thinly and use good soy sauce.
Showing posts with label skills. Show all posts
Showing posts with label skills. Show all posts
Brazing Copper to Steel with Gasflux C-04 Nickel Bronze
While researching something else the other day, I came across a few people wondering how to join copper and steel. I had to do this once and had great success using this method, so much so that I've used it a few times since.
--
I use Gasflux C-04 nickel bronze in 3/32" diameter, along with their Type B blue paste flux. These should be available through Airgas on the East Coast. Low-fuming bronze from the local welding store is not at all the same thing.
Copper, being much more thermally conductive than steel, quickly sucks heat away from the joint. So if the copper you're brazing is connected to more copper, be prepared to heat up the whole mess, which can take a lot of heat.
Conversely, steel is slow to disperse heat, so you may want to preheat the steel to avoid overheating the copper, especially if there's a lot of steel and not so much copper. By the time the steel comes up to temp, the copper may be hot enough to flow brazing filler, just from being around the steel.
All that said, this is not a very hard joint to braze. If you've done blacksmithing or basic MIG or stick welding, this would be a lot easier to learn than TIG. A quick practice joint or two would suffice for training.
There are other ways to join copper and steel, like silver soldering, but this method may create a stronger joint than silver, especially in a tee or butt joint. Bronze fillers (like C-04) are better for filling gaps than silver fillers.
This method works especially well for brazing copper tube passing through a hole in sheet steel. The hole need not have a perfect clearance fit around the pipe, and the tube need not be perfectly centered in the hole.
As in all brazing operations, freshly-sanded, clean, oil-free parent metals are highly recommended.
If the copper gets too hot, it'll open up a hole, which would likely mean replacing the copper, so watch out for that.
Discoloration of the copper is normal and can be easily removed with abrasives like Scotch-Brite and emery roll.
Copper anneals at temperatures well below brazing temperatures. Be prepared for the copper to soften considerably.
I've always used oxy-acetylene, but oxy-propane would surely work.
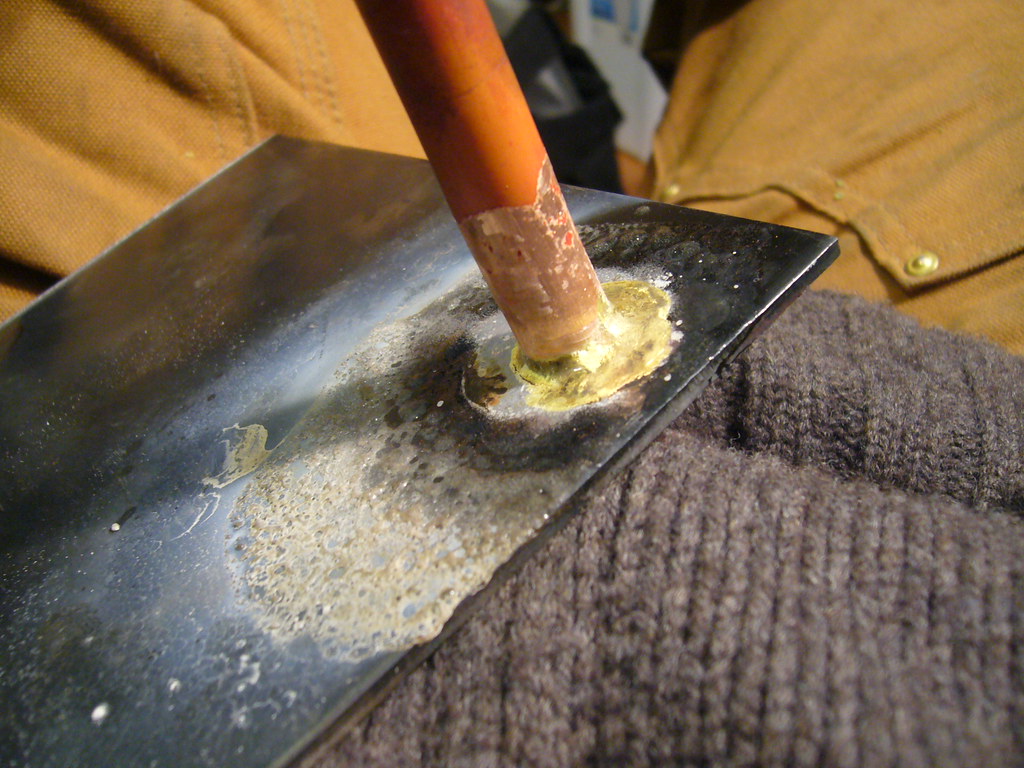
UPDATE: Here's an example.
 Not my absolute best work, but good enough. Flux was applied to the steel only in a small circle, hence the black oxidation everywhere.
--
I use Gasflux C-04 nickel bronze in 3/32" diameter, along with their Type B blue paste flux. These should be available through Airgas on the East Coast. Low-fuming bronze from the local welding store is not at all the same thing.
Copper, being much more thermally conductive than steel, quickly sucks heat away from the joint. So if the copper you're brazing is connected to more copper, be prepared to heat up the whole mess, which can take a lot of heat.
Conversely, steel is slow to disperse heat, so you may want to preheat the steel to avoid overheating the copper, especially if there's a lot of steel and not so much copper. By the time the steel comes up to temp, the copper may be hot enough to flow brazing filler, just from being around the steel.
All that said, this is not a very hard joint to braze. If you've done blacksmithing or basic MIG or stick welding, this would be a lot easier to learn than TIG. A quick practice joint or two would suffice for training.
There are other ways to join copper and steel, like silver soldering, but this method may create a stronger joint than silver, especially in a tee or butt joint. Bronze fillers (like C-04) are better for filling gaps than silver fillers.
This method works especially well for brazing copper tube passing through a hole in sheet steel. The hole need not have a perfect clearance fit around the pipe, and the tube need not be perfectly centered in the hole.
As in all brazing operations, freshly-sanded, clean, oil-free parent metals are highly recommended.
If the copper gets too hot, it'll open up a hole, which would likely mean replacing the copper, so watch out for that.
Discoloration of the copper is normal and can be easily removed with abrasives like Scotch-Brite and emery roll.
Copper anneals at temperatures well below brazing temperatures. Be prepared for the copper to soften considerably.
I've always used oxy-acetylene, but oxy-propane would surely work.
UPDATE: Here's an example.
Plumbing 55-gal. Plastic Barrels for Water Storage
Why Barrels?
- common waste product
- may be available free
- strong, lightweight, durable, good on water quality

Several types of barrels
removable top/"open-top"
- can be re-used in many ways (compost turner?)
- rarer around here
- more expensive to buy new
"Closed top" barrels
- used fo the design below
- more common
- cheaper to buy new
- fewer re-use possibilities besides liquid storage
- no removable lid, just two threaded holes:

The best barrels for water storage have only held food products, like cola syrup, grain/baking supplies, juices, sauces, animal feed?
On the other hand, this design calls for many PVC joints (see below), meaning many fittings and much time spent fitting them. The price of the PVC fittings may greatly exceed the cost of the barrels. The time required to plumb more than a few barrels may be prohibitive. Fortunately, the design is fully scalable, all the way down to a single barrel.
This system is intended to be connected to a house gutter to provide rainwater storage, ultimately feeding an irrigation system for a garden plot.
On Bungs
Closed-top barrels usually have two threaded holes, one coarse-threaded, the other fine-threaded.
Coarse thread hole/"bung"
- funky threading: buttress threads
- but: bung cap has an adapter for 3/4" NPT
Fine thread bung
- regular 2" NPT female threads
Bung caps are made to accept a bung wrench for opening and closing
You can buy one or you can make one.
A pair of pliers will work in a pinch.
Barrel Support
Weight of water is an important consideration.
Water weighs eight pounds per gallon.
A full 55-gal barrel weighs more than 440 pounds.
Some barrel system designs require the construction of a sturdy timber frame for stacking the barrels. This is a fine idea if you have the necessary time, resources, and expertise. I do not.
Instead: stacked barrels in a pyramid--cheaper, faster to construct, more mobile, less resource-consumptive than timber frame.


- Avoid crushing empty barrels. Full barrels shouldn't sit on top of empty ones.
- Prevent the barrels from rolling away when full. Wire rope wrapped around the barrels like a giant rubber band might work
- Prevent the barrels from blowing away in the wind when empty.
- The higher the barrels are, the greater the pressure at the outlet. Might want to make a base from something sturdy. For more, see this.
Plumbing the Barrels

Scale up/down to suit.
One feature of this design: the nominal distance between any two connected bungs is ~23 inches (diameter of one barrel).
Why is This "Untested"?
We found a local source for IBCs at $20 each, cheaper than plumbing the comparable number of barrels. (2 IBCs = ~600 gallons for $40).
We've had a hard time finding suitable barrels for free in the Richmond area.
Faster to install 2 IBCs than 10 barrels.
But, I couldn't find anything on the intertubes about this.
Related Reading
Art Ludwig, Water Storage: Tanks, Cisterns, Aquifers, and Ponds
Stacy Pettigrew and Scott Kellogg, Toolbox for Sustainable City Living: A Do-it-Ourselves Guide
Shop Skills I Possess
Know-how and good sense are the shibboleths of the shop; they are inadequately conveyed in writing. But here goes.
Notes
- I'm a designer, prototyper, troubleshooter, and problem-solver.
- I love designing and fabricating one-off solutions to complex problems.
- I love teaching to interested students.
- I learn new skills quickly.
- Steel is my favorite material. Aluminum, copper, brass, and hardwoods are nice, too. I know little about plastics and composites.
Introductory Level
Small gas engine maintenance and repair
Automobile maintenance
Oxy-acetylene welding
CNC machining
Some Experience
Stick welding
Advanced machining (e.g. lathe-cut threads, high-precision work)
Sheet metal work (bending brake, shear)
Blacksmithing/forging steel
Epoxies (wood, metal, plastics)
Tube bending, especially thin-wall steel
Fine woodworking
Table saw (wood)
Wood and metal finishing
Lots of Experience
TIG welding
MIG welding
Brazing steel, with brass or silver filler
Copper pipe (cutting, sweating, brazing to steel)
Basic machining (turning and milling)
Drilling and tapping
Horizontal and vertical band saws (wood and metal)
Power sanders, grinders, chop saws, miter saws
Precision layout and measurement to .001 inch or .1 mm
Bicycle maintenance, repair, assembly
Bondo (applying, shaping)
AutoCAD (2D)
AutoCAD Inventor (parametric solid modeling)
Relevant Coursework:
Welding Techniques, Caldwell Community College, Boone, NC
Computer-Aided Drafting II, J. Sargent Reynolds Community College, Richmond, VA
Small Gasoline Engines, J. Sargent Reynolds Community College, Richmond, VA
Machine Shop Practices, John Tyler Community College, Richmond, VA
Machine Blueprint Reading, John Tyler Community College, Richmond, VA
Intro to Digital Drafting, Corcoran College of Art + Design, Washington, DC
Furniture Fundamentals, Corcoran College of Art + Design, Washington, DC
Relevant Work History
Graduate Assistant, Department of Technology, Appalachian State University, Boone, NC
Volunteer, Appropriate Infrastructure Development Group, Quetzaltenango, Guatemala
Technical Consultant, MARZ Industries, Richmond, VA
Journeyman Framebuilder, Tektonics Design Group, Richmond, VA
Student Shop Foreman, Machine Shop, School of Engineering, Virginia Commonwealth University, Richmond, VA
President and Co-Founder, Bike Fabricators at VCU, Richmond, VA
Shop Assistant, CNK Machine Manufacturing, Richmond, VA
Intern, Fabrication and Model Shop units, Office of Exhibits Central, Smithsonian Institution, Washington, DC
Lab Technician, Sculpture Department, Corcoran College of Art + Design, Washington, DC
Why the Shop
I spend a lot of time in a shop. I consider myself a shop person. But most of the people in my life are not shop people, with only a few exceptions.
I often think about how to relate to non-shop people about the shop. "Why do you spend so much damn time down there?", they ask. "You always come home filthy." "What's so exciting about screw threading of all things?" "What's the point of endlessly tinkering?"
It's especially difficult to discuss, perhaps, because the shop is not generally a place I go to accomplish a specific thing. I might go there to work on one problem but end up working on the shop itself. Sometimes the tool I need is broken, so I spend an afternoon making a new one, or fixing the old one. The work is often non-linear; I work on what needs to be worked on.
Not many places are ambiguous in this way. A kitchen is for cooking; a classroom is for learning; a theater is for seeing shows. A shop can be for doing anything, and its purpose can change momentarily. A shop is for working on things, but that includes the shop itself and everything in it.
Working in a shop can have a wonderfully self-reflexive feeling, of constantly re-examining the tools, the process, the shop--even the people in the shop, including yourself.
A shop is a place where all variables are in flux. A mill, for example, is so versatile that it could be used to produce a copy of itself*. When you're standing in front of a mill, the question is not "What is possible?" but now "What do I want to do?".
In the shop, the only limitation is you. It's up to you to decide what deserves your time and effort. It's a nice metaphor for growing up.
But why machine tools and screw threads and such? What dispassionate things to study and to have strong opinions about.
There's a feeling I get after I've been using a lathe for a while. I don't mean any lathe, I mean one specific lathe, because each one is a little different. When I first start using it, I take my time flipping every lever, making sure I don't make some catastrophic mistake. But over time the lathe and I come to an understanding. I learn her idiosyncrasies, and she lets me know when I'm pushing her too far. After a few weeks, I'm flipping levers left and right. I know every control without taking an eye off the workpiece. I like to use the words sensual and intimate in describing this feeling. It's a little like raising a dog.
My old machining teacher liked to refer to using a machine tool like driving a car, e.g. "How do I drive this daggone mill?". For my part I think of it more like flying an airplane. It's more complicated than driving a car, but the possibilities are greater. Pilots are an elite, sometimes cocky bunch, much like machinists. Among those in the know, what they do inspires awe.
Machine tools are anything but cold. It honors me to include myself in a tradition that bears the mark of so many great people, including a few of my ancestors. It brings me closer to a history I don't fully understand yet. It gives me something in common with everyone who's ever made something well.
It's by learning to apply tools well that we have advanced our human condition. Our survival depends on knowing how to manipulate our world with tools, and on continuing to pass on that knowledge.
And by the way:
Besides being essential to everything we do, screw threads are, in one sense, a culmination of all human experiences. Their development is the result of many tiny decisions made by many people over many centuries. The most recent decisions were based on older decisions, which were based on yet older ones. That legacy goes back to the earliest humans. And without exaggerating, it can be said that screw threading standards have made fortunes and lost them.
In fact, every modern tool is a permutation of some simple, primitive tool. It was when we first started using these simple tools that we became technological--that we began a period of ever-increasing improvement upon what came before.
*This is theoretically true, but it's not something that happens often. It would require almost fantastical quantities of metal and time. Some of the tools used to make machine tools are friggin' huge.
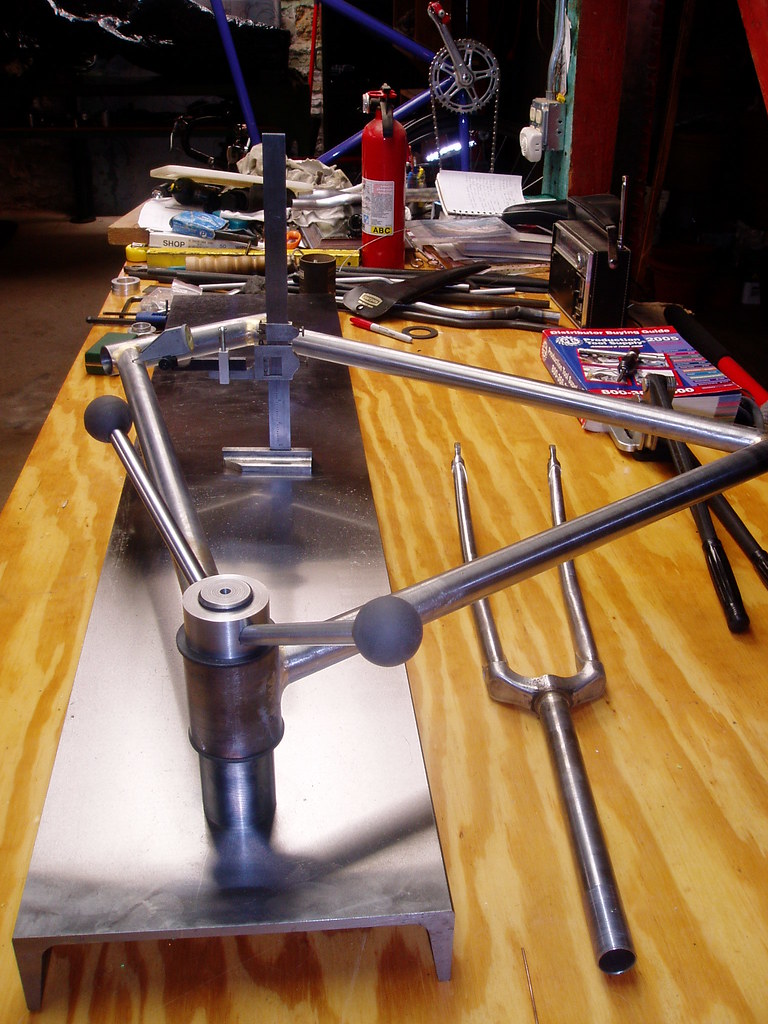
On Alignment and Alignment Tooling
From Richard Sachs via this post (edited for clarity):
The fixture, once set up, is the part that holds all the mitered tubes.
A full front triangle is assembled, fluxed, and pinned.
I tack the bands on the head lugs, and the sometimes the points of the top and down tube lugs. (it depends on the fits).
I remove this ass'y and transfer it to the alignment table and use tube standards to keep the frame's own weight from skewing a reading.
I tack the seat tube/bb are in alignment.
I ensure the the head tube is "straight" using an M+L (Marchetti tool that extends a steering axis reading over a meter's length.
Then - i free braze all of this, because at this junction, the only errors
Are from my inattention rather than the tools. once the front triangle is brazed.
The flux washed, and the head tube reamed, i use the alignment table to see how close i came.
As jon wrote/suggested, the frames i keep are the ones that meet my alignment standards.
The ones that don't, get tossed.
I toss 3-4 a year on average.
e-RICHIE©™®
from Andy Stewart via this post:
From Doug Fattic via this post:
A fancy Italian-made alignment tool plus detail
Alex Wetmore has some sweet alignment tools he made in his basement, especially these dummy headset bits that hold a 7/8" cheater bar
--
From Cory Swartz


From Alex Meade:

Alex says:
Thanks to all who contributed.
Jamie Swan's piece in the Spring 2006 issue (Vol. 4, No. 3) of Vintage Bicycle Quarterly is required reading on the subject of frame alignment.
When I first got it I did very basic frame positioning for alignment. Simple "C" clamped the BB to the surface and used a Vernier caliper as a height gauge to measure up to the tubes. As time, imagination and $ allowed I've added a proper BB post, solid measuring tools, dial gauge and recently a fork vice/block for the surface. Each has made working with the surface easier and quicker. My time to build is hard to get these days so being able to take a pinned and tacked main triangle, align it and finish braze it quickly is nice. My BB post is a home designed thing. Steel, hardened and ground. Simple machine bolts and stepped washer are the clamp. Small machinePhotos of Andy's setup from my visit to his shop are on my Flickr
screw jacks act as the risers for tube support during bending. Various bars act as levers. Home made head tube cones for the alignment bar.
From Doug Fattic via this post:
One thing to remember if one is using V blocks on a flat surface to hold tubes is that the height difference between their flat bottom is not the same as the contact points of the V in the block. In other words, you can't raise the bottom of top tube (when it is a 1" tube) V block 1/16" (1/2 the diameter so the tube's centerlines agree) higher than a seat tube V block for a 1 1/8" tube. If memory serves me correctly it is .088" per 1/16" of diameter difference. I've got the formula somewhere if someone wants it.
This should be the height difference (.088") of the shim below a V block holding a 1" tube and a V block holding a 1 1/8" tube. Engineering students will already know this but my undergraduate and graduate studies were in the behavioral sciences (psychology, counseling) so it had to be explained to me.
--
Alex Wetmore has some sweet alignment tools he made in his basement, especially these dummy headset bits that hold a 7/8" cheater bar
--
From Cory Swartz
I've made a few different BB posts recently, for different things. 68mm was the intended shell, but 70, 73, anything w/ that same OD/ID would work.
Tandems, EBB, BMX would require some additional pcs that I haven't worked out just yet.
Used 2" round stock, 1018 CRS. Maybe not the fanciest but it is quite economic and very readily available.
I made the diameter to fit inside the bb 1.325" if I remember correctly, nice and snug but not too tight to bugger the threads.
Basically just split the 68mm width in half w/ about an extra .030" or so clearance between the two pcs in case you come across a shell that's a little undersized in width. That's how I got that length, and the bottom surface of the shell to the top of the plate at 100mm seems to be pretty popular.
I think I made the top "cap"(?) @ 1" thick, 3/4" maybe, I forget....
Tapped a 3/8" hole in the center of the bottom and clearance and c/bore for the 3/8 SHCS in the top to hold 'em together.
The bottom of the bottom would be tapped whatever you want. 5/8 or 3/4 or even 1" would be my pick if the bolt holding it to the table is really long.
The one I did for Owen [Lloyd] a while back I think was 3/8, but then he had some other mounting considerations involved.

This is the one I made for Owen [Lloyd], so he could mount to existing inserts in his surface table.

The other(taken apart) is one I made a year or so ago as a "first shot" playing w/ stuff, but you can get the idea...--
From Alex Meade:
Alex says:
Pretty basic. Hunk of channel iron, which I was fortunate enough to be able to talk a friend into surface grinding for me. Post started out as 2" diam A2 tool steel (got it cheap on eBay), turned threads on both ends, a big nut holds it to the bottom of the channel iron. If I had it to do over again, I'd have turned the post to be a nice tight slip fit for Campy BB facing tool inserts. As it stands now, I usually have to loosen/tighten the top nut after a good tweak to the frame. One day maybe I'll make some inserts for it. Once I finished the post, I heat treated it to Rc 62 so the shoulder doesn't wear with repeated contact with BB shells. So far so good on that score. Top nut is aluminum.--
Thanks to all who contributed.
Jamie Swan's piece in the Spring 2006 issue (Vol. 4, No. 3) of Vintage Bicycle Quarterly is required reading on the subject of frame alignment.
On tube bending
A local company is trying to bend some 3/4" 4130 tubing to use as stays on BMX frames. I hope to help them make this happen.
I did a little research on this and found this page about bending tubing for recumbents:
http://www.ihpva.org/people/tstrike/building/tubebend.htm
Apparently, bends become difficult or impossible when
( tube diameter / wall thickness )
exceeds 20 : 1.
The .75" x .035" wall tube they've been experimenting with has a ratio of 21.4 : 1, which has led to serious crinkling.
So I will recommend either decreasing tube diameter, like to 5/8":
5/8" (.625") x .035" wall = 17.9 : 1
or, better yet, increasing wall thickness, like to .049":
.75" x .049" wall = 15.3 : 1
Of course, changing this tube spec will affect the frame design. Larger-diameter, thinner-walled tubing is generally stiffer (up to a point) than smaller-diameter, thicker-walled tubing.
Furthermore, bends become difficult or impossible when
( bending diameter / tubing diameter )
is below 8 : 1.
Hence .75" tubing ought to be bent on at least a 3" radius mandrel, which is pretty reasonable. A fork blade bent around a 6" radius is considered "tight".
And of course, the bending rig should accommodate the tubing as described in the link above: good rigidity, mandrels shaped to fit the tube closely, etc.
On Making Pasta
I cook pasta rarely, because I try to limit the amount of starch I eat.
I cook pasta like I braze (or rather like I try to braze). Get it hot, get it done, and get out. Don't cook it any longer than necessary.
Salt the water before you even start it boiling. Use plenty of coarse salt. Helps it boil faster. [Maybe. See below.]
Taste the pasta while it's cooking. I do this about three times. Ignore the clock and timer. Take into account that you want it have a little bite when you eat it, and that it will keep cooking a little after you drain it. You want pasta to be about medium-rare when you eat it, so cook it to rare.
Drain the pasta well when you're done, and do it quickly. You want all that hot water out of there so it cools down and stops cooking ASAP. Shaking the colander can help.
Coat the pasta with a little olive oil when it's still in the colander. Keeps it from sticking. Use a light olive oil of the finest quality you can get. Imported from Spain or Italy and Extra virgin for sure. First cold press if possible.
Use the right materials. Good, fresh pasta is great, though usually too rich for my budget. Good olive oil is relatively cheap, and necessary for so many other things. Salt in the water is essential. Likewise a good pot of the right size, depending on how much is being cooked. And plenty of water.
Bad pasta was cooked in too small a pan, with too little water, for too long, then sat in the waer for a few minutes before it was drained, and not coated in oil afterward. It tastes so bad. It tastes like the worst airline food on the worst airline.
Rethinking Occupational Taxonomies
Back when I wanted to be an aerospace engineer, I did some research and came away with the following understanding of how things worked:
1. Scientists do the theoretical stuff.
2. Engineers design stuff, solve problems, and apply the scientists' theory.
3. Technicians install/build/make what the engineers designed.
A semester of engineering school made it abundantly clear I was not destined to be an engineer. So I've been trying to decide ever since...Where do I fit in this hierarchy?
Now I have realized some key truths:
1. Engineers, bless their hearts, often lack on-the-shop-floor experience, which can cause problems in the design process.
2. There are actually more than three positions in that 1-2-3 hierarchy.
3. Especially under sub-optimal conditions, the lines between Engineer and Technician are often blurred.
4. People who are good at their thing often have a lot of knowledge that overlaps with the areas around them--e.g. good engineers know a lot about technicians' jobs.
filler and flux specs
as listed here:
SIF SILVER SOLDER No.43 (Cd free)
BS: 1845 AG14
CADMIUM FREE 55% Silver Solder, which is free flowing and ideal for close fitting capillary joints and for colour match on stainless.
1.5 mm diameter; melting range 630-660°C (1166-1220°F); typical composition 55% Ag, 21% Cu, 22% Zn, 2% Sn
their Cadmium-bearing No. 42 solder (42% Ag, 25% Cd) melts at a temperature about 30° F cooler and has slightly higher tensile strength.
as listed here:
Gasflux Type U white paste flux is effective from 565-870° C (1050-1600° F).
as listed here:
Wolverine Silvaloy A45 (45% Ag, 30% Cu, 25% Zn) melts between 1225° F and 1370° F.
i'm planning a trip down to the Airgas store near me for from Harris black flux (sorta cheating, this is getting frustrating), maybe some Harris 56% filler, and thin leather gloves (filler is tought to pick up with welding gloves, and i'm not yet very experienced with the torch).
as listed here, Harris Safety-Silv 56 has a different makeup than the similar Sif product: 1 percentage point more Ag, 1 pp more Cu, 5 pp less Zn, 3 pp more Sn. i could see that making a bit of difference, especially the extra tin. and i only have a couple troy oz. of Sif left because i've been globbing it on so much, so i need more anyways.
oh, the Harris spec sheet pdf lists a melting range of 1145-1205°F for Safety-Silv 56, about 20° F lower than Sif 43. will that be noticeable? i'll report soon.
first metal class
started my intro to metal sculpture class last night. great instructor, talked for about 3 hours straight. we covered all the safety stuff, which took most of the time, and then went over how to use an oxy-acetylene rig. the class will mostly focus on MIG welding, but i think i'll be able to get enough brazing practice. plus learning to MIG can't hurt.
this is just meant to be FYI. i can imagine it being useful if one wanted to build their own brazing rig, or even just to better understand how this mysterious contraption works.
i'll start with a breakdown of the parts involved in an oxy-fuel rig:
tanks: one for oxy, one for fuel. each tank has a valve directly attached to it, acting as the main on-off.
regulators: each tank has one attached directly downstream of the tank valve. generally oxy regulator dials are green and fuel are red. controls how much gas pressure flows through the lines. clockwise turning of the screw increases pressure; when screw feels loose, regulator is off.
lines/hoses: same color-coding as regulator dials. connections for fuel are reverse-threaded to avoid confusion.
flashback arrestors: one for each line, located downstream of it right where it attaches to the torch. prevents flashback, which is really bad but that's all i know about it. make sure they're tight.
mixing handle/torch/torch handle: this is the big brass cylinder that one holds while welding/cutting/heating/brazing. gases from the lines mix here. has a valve for each gas to control how much is let in.
tip: secured to the handle by means of a collar. interchangeable for welding different thicknesses of metal and different purposes.
safety check
1. make sure tanks are chained up.
2. make sure regulator screws are loose (off).
3. make sure torch knobs are tight (off).
start-up
open acetylene tank valve handle half turn
crack oxy tank valve handle slowly, then open fully
open acetylene torch valve about half turn
open acetylene regulator to recommended psi (refer to chart; based on tip size)
close acetylene torch valve
open oxygen torch valve about half turn
open oxygen regulator to recommended psi (refer to chart; based on tip size; add 1-2 psi usually)
close oxygen torch handle valve
the reason for all this opening and closing is to set the regulator when the lines are open at the torch end, because the recommended pressures are for flow pressure (as opposed to static pressure, when the lines are closed and the gas is contained).
lighting the torch
put on welding gloves and put goggles on head (not over eyes yet).
open acetylene torch valve quarter turn
if there's a gap between tip and flame, close acetylene valve until flame smokes, then open up; gap should disappear.
put goggles over eyes
crack oxygen torch valve slowly with thumb and palm, then open up with fingertips to adjust flame. neutral is best for welding mild steel, but i think it's different for brazing. neutral means the outer blue cone is the same size as the inner blue cone.
turning torch off
close oxygen torch valve
close acetylene torch valve
rub tip on glove or pants or whatever to remove any acetylene buildup
shutting down
turn off acetylene tank valve--tight
turn off oxygen tank valve--tight
bleed each line, acetylene 1st, by opening respective torch valve half turn until regulator reads 0, then close torch valve.
loosen/close both regulator screws (about 2 turns)
remove torch tip
loosely wind hoses around cart handles
does this jive with what others do?
Subscribe to:
Comments (Atom)

